Category

VXDIAG VCX CAN FD Connection:
How to Install VXDIAG GDS2 and Tech2win?
1. Install Tech2win using the AutoInstall.exe file
2. Install GDS2 using the AutoInstall.exe file
3. Install VX Manager (install passthru and GDS2/T2W drivers)
4. Run software (run GDS2 from patch, run Tech2win on desktop)
* If you are running Windows 10 you MUST disable driver signing enforcement. For detail installation instruction, check PDF above.
GDS 2 provides the following capabilities in multiple languages:
* Read codes, code status, Freeze Frame data and Clear Codes.
* Read VIN, ECU part numbers and software numbers.
* Record, store and replay Stored data.
* Control and monitor Output Control functions.
* Configure and Reset functions.
* Record or display history of the previous vehicle diagnostic sessions.
GDS2 Languages: English, Spanish, French, Italian, Portuguese, Netherlands, Russian, Arabic, Japanese, Chinese, Vietnamese
VXDIAG VCX CAN FD Functions:


 \
\
Tech2Win Function
Tech2Win, an application version of the Tech 2 and CANdi (Control Area Network diagnostic interface) moduleTech2Win can be used during a vehicle road test, offering a larger screen with all of the Tech 2 tool functionality. The Tech2Win application offers all of the features and functions of the Tech 2 for Opel etc. Tech2win need to install on win 7 32 bits.
DPS Function:
Development programming system, aka DPS, is an in-house software general motors technicians use to develop software for GMs motor vehicle electronic modules. DPS functions similarly to the GMs SPS client. By itself, DPS can only perform the basic functions of reading the ECU ID information. You must acquire the corresponding calibration files and custom DPS scripts to complete any DPS programming.
How to Set Up & Use VXDIAG VCX-FD?
Let’s start the software installation on WINDOWS system:

1. First download and install software (we don't provide the link)
2. Install the latest VX MANAGER version via www.vxdiag.net
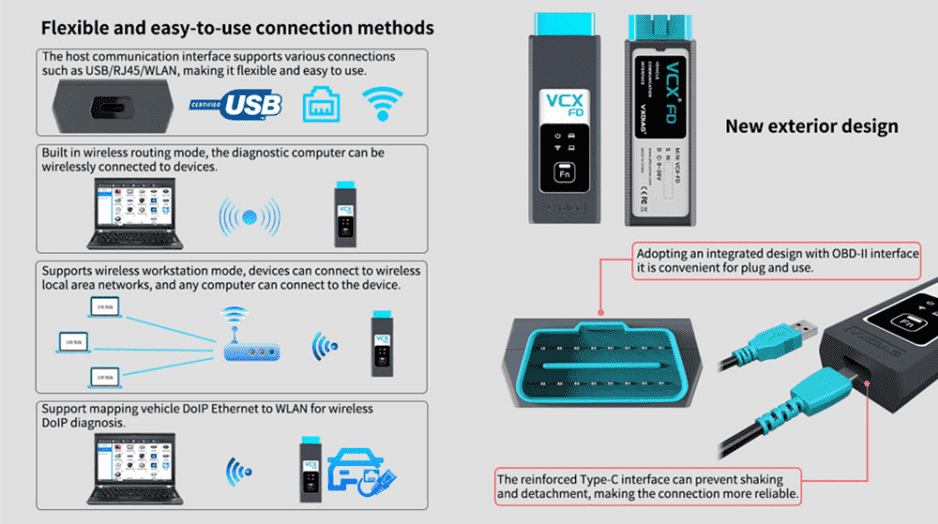
3. Start the VX Manager. Make sure you your computer network is good. Connect your device by USB cable/WiFi to computer and OBD2 Socket to your ECU Bench connector or Your car’s OBD2 Port.
4. Install Passthru driver. Check your device license.
5. Turn on the car ignition. You can start to diagnose the car.
Installation Tips: Please turn off anti-virus software before install.
VXDIAG VCX FD Parameters:
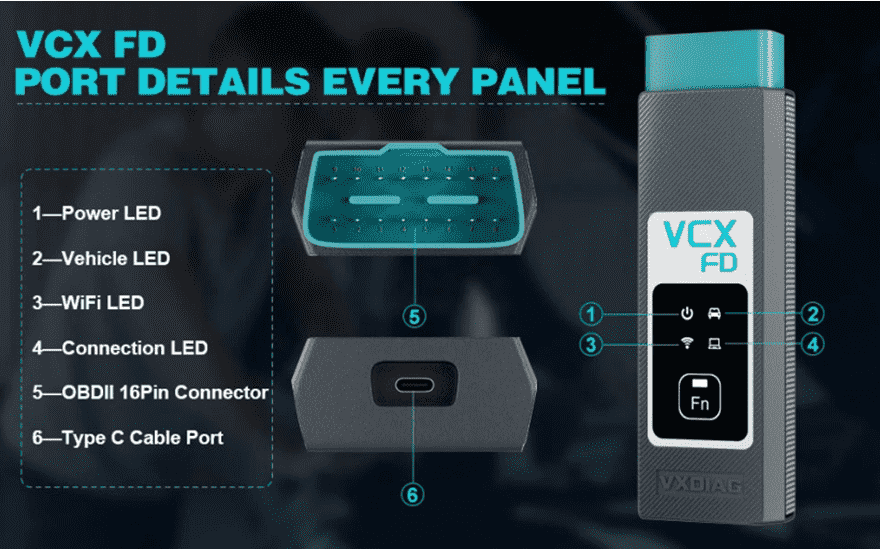
1-Power LED: Equipment Working Status: RED
Breathing flash when starting normally
Flash rapidly during hardware failure
2-Vehilcle LED: Vehicle communication Status:TWO-COLOR
Flash blue during traditional protocol
Flash green during DoIP protocol
3-WiFi LED: Wireless Network Status: BLUE
Flash quickly during wireless communication
Flash slowly during wireless distribution
4-Conection LED: Host Communication Status: TWO-COLOR
Flash BLUE during USB communication
Flash GREEN during LAN communication
Fn Button: Remote Diagnostic Status: GREEN
Flash slowly after remote connection
Flash quickly during remote diagnosis
5-OBDII 16Pin Connector: Connect to vehicle's OBD2 port
6-Type C Cable Port: Connect to PC via cable
VXDIAG VCX FD OBD2 Diagnostic Tool Packing List:
1pc x VCX-FD Interface
1pc x Type-C USB Cable
1pc x RJ45 Lan Converter
1pc x Paper Case
1pc x Lenovo T450 I5 8G Laptop (Option)
Second Hand Laptop Lenovo T450 Laptop with latest software:
Brand: Lenovo
Condition: Used
Type:Laptop/Notebook
Screen Size:14
Processor Type:Intel (R) Core(TM) I5-5200U CPU
Memory: 8GB

Please feel free to contact us ,If you have any question: Email: Sales@obd2.ltd Whatspp: +8613632856735  Shipping Terms: Shipping Time: Return Policies: Contact Us: Attention: PLZ leave your telephone number and address in detail when you take order in our website, it is very important to ship your order. (Customers from Brazil PLZ leave your Cutsom ID also, thanks!) |